CleverTap
20 minute read
CleverTap is a popular customer engagement and retention platform. Its in-app analytics and marketing capabilities allow you to get real-time insights into your customers and build valuable, long-term relationships with them.
Find the open source transformer code for this destination in the GitHub repository.
Connection compatibility
| Destination Information | |||
|---|---|---|---|
| |||


In the web device mode integration, that is, using the JavaScript SDK as a source, RudderStack loads the CleverTap native SDK from the
https://d2r1yp2w7bby2u.cloudfront.netdomain.Based on your website’s content security policy, you may need to allowlist this domain to load the CleverTap SDK.
Get started
Once you have confirmed that the source platform supports sending events to CleverTap, follow these steps:
- From your RudderStack dashboard, add a source. Then, from the list of destinations, select CleverTap.
- Assign a name to the destination and click Continue.
Connection settings
| Setting | Description |
|---|---|
| Account ID | Your account ID is a unique ID generated for your account. You can find it in your account Settings as your Project ID. |
| Passcode | Your account passcode is a unique code generated for your account. You can find it in your CleverTap dashboard by going to Settings > Passcode. |
| Account Token | Your CleverTap account token — this setting is required for mobile device mode integrations, including iOS (Swift) and Android (Kotlin). |
| Enable track for anonymous user | Enable this option to track anonymous users in CleverTap. |
| Use CleverTap ObjectId for Mapping | Enable this option to use both CleverTap objectId along with identity for mapping events from RudderStack to CleverTap. |
| Region | Select your CleverTap region. |
| Client-side Events Filtering | Specify which events should be blocked or allowed to flow through to CleverTap. For more information on this setting, see the Client-side Events Filtering guide. |
| Consent management settings | Configure the consent management settings for the specified source by choosing the Consent management provider from the dropdown and entering the relevant consent category IDs. See Consent Management in RudderStack for more information. |
| Use device mode to send events | Toggle on this setting to send events in device mode. |
All server-side destination requests require either ananonymousIdor auserIdin the payload.
Adding device mode integration
Follow these steps to add CleverTap to your Swift project using Swift Package Manager:
- In Xcode, select File > Add Package Dependencies….
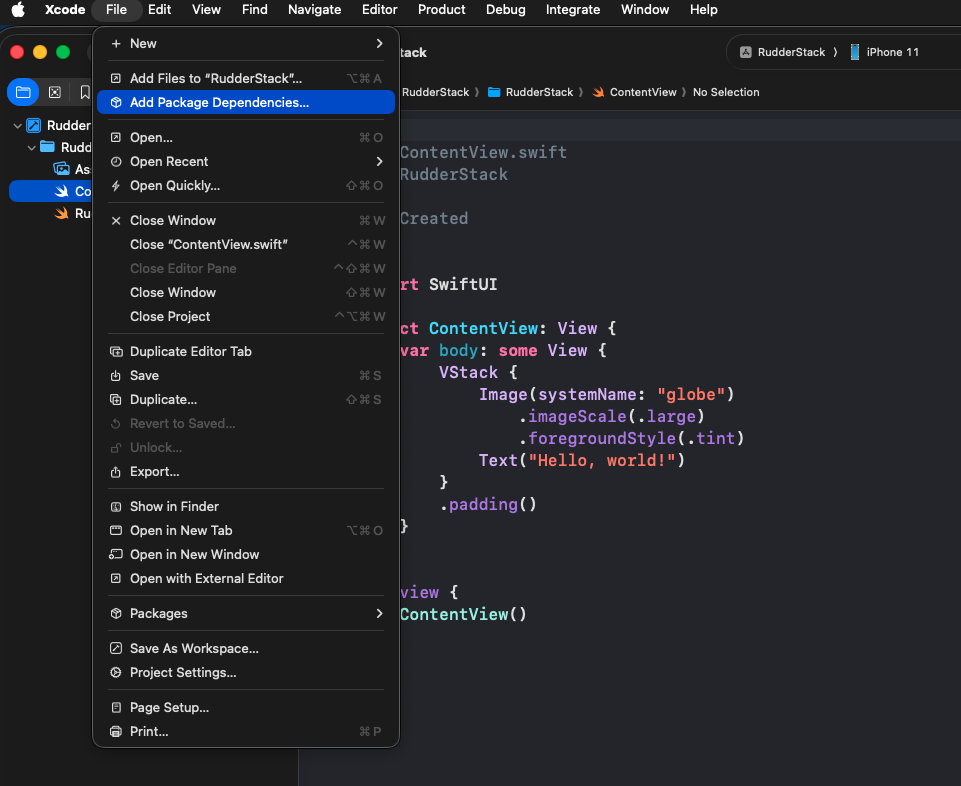
- Enter the below package repository URL in the search bar:
https://github.com/rudderlabs/integration-swift-clevertap/- Select the latest version and the target to which you want to add the package.
- Click Add Package.
Alternatively, you can add the dependency to your Package.swift file, as shown:
dependencies: [
    .package(url: "https://github.com/rudderlabs/integration-swift-clevertap.git", from: "<latest_integration_version>")
]
Usage
- Import the SDK and the integration:
import RudderStackAnalytics
import RudderIntegrationCleverTap- Add
CleverTapIntegrationto youranalyticsinstance:
// Initialize RudderStack Analytics
let analytics = Analytics(
    configuration: Configuration(
        writeKey: "<WRITE_KEY>",
        dataPlaneUrl: "<DATA_PLANE_URL>"
    )
)

// Add CleverTap Integration
analytics.add(plugin: CleverTapIntegration())
The Swift integration initializes the CleverTap iOS SDK from your RudderStack dashboard settings when you enable device mode. Configure Account ID, Account Token, and Region in the destination settings before adding the plugin to your app. Server-side CleverTap API requests use the Passcode setting.
The CleverTap integration requires a minimum SDK version (minSdk) of 23.
Follow these steps to add CleverTap to your Kotlin project:
- In your module (app-level) Gradle file (usually
<project>/<app-module>/build.gradle.ktsor<project>/<app-module>/build.gradle), add the following dependencies:
dependencies {
  // ...

  // Add Rudder Kotlin and CleverTap integration SDKs:
  implementation("com.rudderstack.sdk.kotlin:android:<latest-version>")
  implementation("com.rudderstack.integration.kotlin:clevertap:<latest-version>")
}
The integration supports the CleverTap Android SDK versions in the range[8.4.1, 9.0.0). The CleverTap integration 2.0.0 and later requires the Android (Kotlin) SDK 2.0.0 or later.
- Add the following permissions to your
AndroidManifest.xmlfile:
<uses-permission android:name="android.permission.INTERNET" />
<uses-permission android:name="android.permission.ACCESS_NETWORK_STATE" />- Add the SDK initialization and the
CleverTapIntegrationin yourApplicationclass:
import android.app.Application
import com.rudderstack.sdk.kotlin.android.Analytics
import com.rudderstack.sdk.kotlin.android.Configuration
import com.rudderstack.integration.kotlin.clevertap.CleverTapIntegration

class MyApplication : Application() {
    lateinit var analytics: Analytics

    override fun onCreate() {
        super.onCreate()
        analytics = Analytics(
            configuration = Configuration(
                writeKey = "WRITE_KEY",
                application = this,
                dataPlaneUrl = "DATA_PLANE_URL",
            )
        )

        analytics.add(CleverTapIntegration())
    }
}
The integration initializes the CleverTap SDK with the Account ID, Account Token, and Region values from your destination settings. If you set up CleverTap in your app, CleverTap uses the manifest entries instead.
Breaking changes
| Change | 1.x | 2.0.0 |
|---|---|---|
minSdk | 21 | 23 |
| CleverTap Android SDK range | [7.3.1, 7.7.0) | [8.4.1, 9.0.0) |
| RudderStack Android (Kotlin) SDK | 1.x | 2.0.0 or later |
| Activity tracking | The integration observed the activity lifecycle and forwarded the onActivityResumed and onActivityPaused callbacks to CleverTap. | The integration registers CleverTap’s own activity tracking. CleverTap tracks activities itself. |
| Notification clicks and deep links | The integration read them from the activity intent and forwarded them to CleverTap. | CleverTap reads them from the activity intent. |
AndroidManifest.xml credentials | Optional. | Required if you set up CleverTap in your app. |
To upgrade, raise your minSdk to 23, move to the Android (Kotlin) SDK 2.0.0 or later, and follow the steps in Set up CleverTap in your app if your app sends push notifications, calls CleverTap APIs directly, or tracks the first app screen.
Set up CleverTap in your app
Set up CleverTap in your app if you do any of the following:
- Send CleverTap push notifications to your app.
- Call CleverTap APIs directly from your app, for example Native Display or App Inbox.
- Track the first app screen in CleverTap.
RudderStack creates the CleverTap destination only after the RudderStack SDK fetches the source configuration. Until then, no CleverTap instance exists. CleverTap can drop a push notification that arrives while the app is closed. CleverTap also misses the first screen.
Follow these steps:
- Add the CleverTap Android SDK to your module (app-level) Gradle file. Use a version in the range
[8.4.1, 9.0.0):
This step does not increase your app size. The CleverTap integration already includes the CleverTap Android SDK as a transitive dependency, so the SDK is already packaged in your app.
dependencies {
  // ...
  implementation("com.clevertap.android:clevertap-android-sdk:<version>")
}- Add your CleverTap account ID and account token to the
applicationtag of yourAndroidManifest.xmlfile. Use the same account as in your destination settings. If you set a region in the destination settings, also addCLEVERTAP_REGION.
<application>
    <meta-data android:name="CLEVERTAP_ACCOUNT_ID" android:value="YOUR_ACCOUNT_ID" />
    <meta-data android:name="CLEVERTAP_TOKEN" android:value="YOUR_ACCOUNT_TOKEN" />
    <!-- Only if you set a region in the destination settings -->
    <meta-data android:name="CLEVERTAP_REGION" android:value="YOUR_REGION" />
</application>- Register CleverTap’s activity tracking and create the CleverTap instance in your
Applicationclass. Do both before you initialize the RudderStack SDK:
import android.app.Application
import com.clevertap.android.sdk.ActivityLifecycleCallback
import com.clevertap.android.sdk.CleverTapAPI
import com.rudderstack.integration.kotlin.clevertap.CleverTapIntegration
import com.rudderstack.sdk.kotlin.android.Analytics
import com.rudderstack.sdk.kotlin.android.Configuration

class MyApplication : Application() {
    lateinit var analytics: Analytics

    override fun onCreate() {
        // Lets CleverTap track the first screen, notification clicks, and deep links.
        ActivityLifecycleCallback.register(this)
        super.onCreate()

        // Creates the CleverTap instance from the manifest entries.
        CleverTapAPI.getDefaultInstance(this)

        analytics = Analytics(
            configuration = Configuration(
                writeKey = "WRITE_KEY",
                application = this,
                dataPlaneUrl = "DATA_PLANE_URL",
            )
        )
        analytics.add(CleverTapIntegration())
    }
}
- Do not call
ActivityLifecycleCallback.registerorgetDefaultInstancewithout the manifest entries from step 2. CleverTap reads its credentials only once, when it starts. Without the manifest entries, CleverTap starts with no account, and RudderStack cannot create the CleverTap destination.- Create the CleverTap instance on the main thread, in
Application.onCreate. Do not create it on a background thread or executor. When a push notification starts a closed app, the CleverTap instance must exist before its push handler runs.
- In each activity that a notification can open, forward the notification click and the deep link from
onNewIntent:
import android.content.Intent
import com.clevertap.android.sdk.CleverTapAPI

// In your activity
override fun onNewIntent(intent: Intent) {
    super.onNewIntent(intent)
    setIntent(intent)
    val cleverTap = CleverTapAPI.getDefaultInstance(this)
    cleverTap?.pushNotificationClickedEvent(intent.extras)
    cleverTap?.pushDeepLink(intent.data)
}
When RudderStack creates the destination later, the integration reuses your CleverTap instance:
- CleverTap keeps the credentials it started with, from the manifest entries. The credentials from the destination settings have no effect.
- CleverTap registers its activity tracking only once. The
registercall of the integration has no effect. CleverTap records each event only once.
Call CleverTap APIs
Get the CleverTap instance anywhere in your app with CleverTapAPI.getDefaultInstance(context). For example, to use Native Display:
import com.clevertap.android.sdk.CleverTapAPI

val cleverTap = CleverTapAPI.getDefaultInstance(context)

cleverTap?.setDisplayUnitListener { units ->
    // Render the display units.
}

// unitId: the ID of a display unit, from CleverTapDisplayUnit.unitID
val units = cleverTap?.allDisplayUnits
val unit = cleverTap?.getDisplayUnitForId(unitId)
cleverTap?.pushDisplayUnitViewedEventForID(unitId)
cleverTap?.pushDisplayUnitClickedEventForID(unitId)
Important considerations
- Keep the Account ID and Account Token in the destination settings. Without them, the integration does not create the destination.
- When you set up CleverTap in your app, the manifest entries are the source of the CleverTap credentials. To change the account, change the manifest entries and release a new version of the app. If you do not set up CleverTap in your app, the destination settings are the source.
- If you disable the CleverTap destination in the RudderStack dashboard, RudderStack stops sending events to CleverTap. CleverTap still runs in your app and still shows push notifications.
To add CleverTap to your React Native project:
- Add the RudderStack-CleverTap module to your app using:
npm install @rudderstack/rudder-integration-clevertap-react-native
## OR ##
yarn add @rudderstack/rudder-integration-clevertap-react-native
Run
pod installinside theiosdirectory of your project adding@rudderstack/rudder-integration-clevertap-react-nativeto your project.Import the module you added above and add it to your SDK initialization code as shown below:
import rudderClient from "@rudderstack/rudder-sdk-react-native"
import clevertap from "@rudderstack/rudder-integration-clevertap-react-native"

const config = {
  dataPlaneUrl: DATA_PLANE_URL,
  trackAppLifecycleEvents: true,
  withFactories: [clevertap],
}
rudderClient.setup(WRITE_KEY, config)
To add CleverTap to your Android project and enable functionalities like push notifications, follow these steps:
- Open your project level
build.gradlefile, and add the following:
buildscript {
  repositories {
    mavenCentral()
  }
}

allprojects {
  repositories {
    mavenCentral()
  }
}- Ensure that
android.useAndroidXis set totruein yourgradle.propertiesfile. Add the following under thedependenciessection:
// ruddder core sdk
implementation 'com.rudderstack.android.sdk:core:1.+'
// rudder-clevertap integration
implementation 'com.rudderstack.android.integration:clevertap:1.+'
// clevertap native sdk
implementation 'com.clevertap.android:clevertap-android-sdk:4.+'
// if you don't have Gson included already
implementation 'com.google.code.gson:gson:2.8.6'- Initialize the RudderStack SDK in the
Applicationclass’sonCreate()method as shown:
// initialize Rudder SDK
val rudderClient =
    RudderClient.getInstance(
        this,
        WRITE_KEY,
        RudderConfig.Builder()
            .withDataPlaneUrl(DATA_PLANE_URL)
            .withFactory(CleverTapIntegrationFactory.FACTORY)
            .build()
    )
Follow these steps to add CleverTap to your iOS project:
- Go your
Podfileand add theRudder-CleverTapextension as shown below:
pod 'Rudder-CleverTap'- After adding the dependency followed by
pod install, you can add the imports to yourAppDelegate.mfile:
#import "RudderCleverTapFactory.h"- Change the initialization of your
RudderClientas shown:
RudderConfigBuilder *builder = [[RudderConfigBuilder alloc] init];
[builder withDataPlaneUrl:DATA_PLANE_URL];
[builder withFactory:[RudderCleverTapFactory instance]];
[RudderClient getInstance:WRITE_KEY config:[builder build]];
Identify
The identify call lets you associate a user with their actions and capture relevant traits about them. This information includes userId and other user information like name, email, etc.
RudderStack requires eitheruserIdoridentifyevents to CleverTap.
RudderStack maps the following user traits to the CleverTap attributes:
| RudderStack | CleverTap |
|---|---|
name | Name |
birthday | DOB |
avatar | Photo |
gender | Gender |
phone | Phone |
email | Email |
employed | Employed |
education | Education |
married | Married |
customerType | Customer Type |
RudderStack sends all other traits to CleverTap as custom attributes.
Phone number format requirement
CleverTap requires phone numbers to be formatted as
+[country code][phone number](for example,+14155551234for a U.S. phone number).RudderStack does not modify the phone format in its integration logic — hence, ensure your phone numbers are properly formatted before sending them through RudderStack.
See the CleverTap Upload User Profiles API documentation for more information.
A sample identify call looks like the following:
rudderanalytics.identify("userid", {
  name: "Name Surname",
  email: "name@website.com",
  phone: "+14155551234",
  birthday: "birthday",
  gender: "M",
  avatar: "link to image",
  title: "Owner",
  organization: "Company",
  city: "Tokyo",
  region: "ABC",
  country: "JP",
  zip: "100-0001",
  Flagged: false,
  Residence: "Shibuya",
  MSG-email: false
});
In the above snippet, RudderStack captures relevant information about the user such as the email and phone, along with the associated user traits.
Note that:
- If a user already exists, the new values will be updated for that user. RudderStack automatically maps the
userId(oranoymousId) to CleverTap’sidentityattribute.- The profile properties
MSG-email,MSG-push,MSG-smsandMSG-whatsappare used to set the Do Not Disturb (DND) status for the user. They are alwaystrueby default, unless you explicitly set them tofalse. For example, to disable push notifications for a user, setMSG-pushtofalse.
Privacy options
When loading the RudderStack SDK, you can set the following options in the CLEVERTAP integrations object:
| Option | Data type | Notes |
|---|---|---|
optOut | Boolean | Defaults to false. Set to true if the user opts out of sharing their data. |
useIP | Boolean | Defaults to false. Set to true if the user agrees to share their IP data. |
rudderanalytics.load(
  "WRITE_KEY",
  "DATAPLANE_URL", {
    configUrl: "https://api.rudderlabs.com",
    logLevel: "DEBUG",
    integrations: {
      CleverTap: {
        optOut: true,
        useIP: true,
      }
    }
  }
);
CleverTap does a reverse lookup on the IP of the incoming request in the back end to map the user’s location. Under GDPR laws, user consent is required to initiate this lookup. Use the useIP flag in the web SDK to provide that consent.
If useIP is set to true, the city/country information will populate on the Profile page of the CleverTap dashboard. If set to false, then this data won’t be populated, and the city/country information will be shown as Unknown, Unknown.
See the CleverTap documentation for more information.
Delete a user
You can delete a user in CleverTap using the Suppression with Delete regulation of the RudderStack User Suppression API.
While RudderStack forwards the deletion request, it does not guarantee deletion within a 30-day window. You will need to check with CleverTap if the request is fulfilled.
To delete a user, specify their userId in the event. Additionally, you can specify a custom identifier (optional) in the event.
A sample regulation request body for deleting a user in CleverTap is shown below:
{
  "regulationType": "suppress_with_delete",
  "destinationIds": [
    "2FIKkByqn37FhzczP23eZmURciA"
  ],
  "users": [{
    "userId": "1hKOmRA4GRlm",
    "<customKey>": "<customValue>"
  }]
}
Track
The track call lets you capture user events along with the properties associated with them. The user is associated with userId or anonymousId by default.
A sample track call looks like the following:
rudderanalytics.track("Checked Out", {
  Clicked_Rush_delivery_Button: true,
  total_value: 2000,
  revenue: 2000,
})
In the above snippet, RudderStack captures the information related to the Checked Out event, along with any additional info about that event.
CleverTap does not support nested objects or arrays for custom attributes in thetrackevents. Hence, RudderStack converts the nested objects or arrays into strings before sending them to CleverTap.
Order Completed
When you track an event with the name Order Completed using the using the RudderStack Ecommerce Events tracking, RudderStack maps it to CleverTap’s Charged event.
A number of RudderStack’s specific fields map to CleverTap’s standard Charged event fields
| RudderStack | CleverTap |
|---|---|
checkout_id | Charged ID |
revenue | Amount |
products | Items |
A sample Order Completed event looks like the following:
rudderanalytics.track("Order Completed", {
  checkout_id: "12345",
  order_id: "1234",
  affiliation: "Apple Store",
  "Payment mode": "Credit Card",
  total: 20,
  revenue: 15.0,
  shipping: 22,
  tax: 1,
  discount: 1.5,
  coupon: "Games",
  currency: "USD",
  products: [
    {
      product_id: "123",
      sku: "G-32",
      name: "Monopoly",
      price: 14,
      quantity: 1,
      category: "Games",
      url: "https://www.website.com/product/path",
      image_url: "https://www.website.com/product/path.jpg",
    },
    {
      product_id: "345",
      sku: "F-32",
      name: "UNO",
      price: 3.45,
      quantity: 2,
      category: "Games",
    },
    {
      product_id: "125",
      sku: "S-32",
      name: "Ludo",
      price: 14,
      quantity: 7,
      category: "Games",
      brand: "Ludo King",
    },
  ],
})
Order Completedis a free-flowing event. If you set extra fields likediscount,coupon,currency, etc., RudderStack automatically maps them to theChargedevent properties.
Page
The page call lets you record your website’s page views with any additional relevant information about the viewed page.
RudderStack sends a page event to CleverTap as a Web Page Viewed <Page_Name> event.
An example of a page call is shown below:
rudderanalytics.page("Cart", "Cart Viewed", {
  path: "/cart",
  referrer: "test.com",
  search: "term",
  title: "test_item",
  url: "http://test.in",
})
CleverTap does not support nested objects or arrays for custom attributes in thepageevents. Hence, RudderStack converts the nested objects or arrays into strings before sending them to CleverTap.
Screen
The screen method lets you record whenever your user views their mobile screen, with any additional relevant information about the screen.
A sample screen call is shown:
[[RSClient sharedInstance] screen:@"Sample Screen Name"
        properties:@{@"prop_key" : @"prop_value"}];
In the above snippet, RudderStack captures all information related to the screen being viewed, along with any additional info associated with that screen view event. In CleverTap, the above screen call will be shown as - Screen Viewed: <screen_name> along with the properties.
CleverTap does not support nested objects or arrays for custom attributes in thescreenevents. Hence, RudderStack converts the nested objects or arrays into strings before sending them to CleverTap.
Alias
The alias call lets you merge different identities of a known user.
A sample alias call is shown below:
rudderanalytics.alias("newUserId","userId");Configure push notifications and in-app messages
The iOS (Swift) CleverTap device mode integration does not handle push notification registration, push notification forwarding, device token forwarding, or in-app message setup.
To use CleverTap push notifications or in-app messages in a Swift app, configure them directly with the CleverTap iOS SDK and the Apple notification APIs.
First, complete Set up CleverTap in your app in the Android (Kotlin) tab of Adding device mode integration. Then follow these steps to send push notifications to your app through CleverTap:
- Register your app for push notifications in the CleverTap dashboard under Settings > Channels > Mobile Push > Android. Provide your Firebase Cloud Messaging credentials.
- Register your app in the Firebase console, download the
google-services.jsonfile, and copy it to theappfolder of your project. - Add the Google services plugin to your root-level Gradle file:
plugins {
  // ...
  id("com.google.gms.google-services") version "<latest-version>" apply false
}- In your module (app-level) Gradle file, apply the plugin and add the Firebase Cloud Messaging dependency:
plugins {
  // ...
  id("com.google.gms.google-services")
}

dependencies {
  // ...
  implementation("com.google.firebase:firebase-messaging:<latest-version>")
}
For Firebase Cloud Messaging push delivery, declare CleverTap’s messaging service in the application tag of your AndroidManifest.xml file:
<service
    android:name="com.clevertap.android.sdk.pushnotification.fcm.FcmMessageListenerService"
    android:exported="false">
    <intent-filter>
        <action android:name="com.google.firebase.MESSAGING_EVENT" />
    </intent-filter>
</service>- Create a notification channel in your
Applicationclass, after you create the CleverTap instance:
CleverTapAPI.createNotificationChannel(
    applicationContext,
    "YourChannelId",
    "Your Channel Name",
    "Your Channel Description",
    NotificationManager.IMPORTANCE_MAX,
    true
)- Request the
POST_NOTIFICATIONSruntime permission if your app targets Android 13 or above. The CleverTap SDK declares the permission, but your app must request it from the user.
Notification clicks and deep links
CleverTap reads the notification click details and the deep link from the activity intent. To forward a click that reaches an open activity through onNewIntent, see step 4 of Set up CleverTap in your app. That section is in the Android (Kotlin) tab of Adding device mode integration.
You can also forward the details through the integration. Keep a reference to the integration. The integration ignores these calls until RudderStack creates the destination:
// In Application.onCreate
val cleverTapIntegration = CleverTapIntegration()
analytics.add(cleverTapIntegration)

// In the activity's onNewIntent
cleverTapIntegration.pushNotificationClickedEvent(intent.extras)
cleverTapIntegration.pushDeepLink(intent.data)
In-app messages
CleverTap uses its own activity tracking to display in-app messages. You do not need extra setup. You do not need to set android:name to com.clevertap.android.sdk.Application in your AndroidManifest.xml file.
- Open the
androidfolder of your React Native app and follow the steps listed in the Android tab of this section. - Open the
iosfolder of your React Native app and follow the steps listed in the iOS tab of this section.
- Register push notifications for Android devices on your CleverTap dashboard either by uploading your FCM credentials or any other supported credentials by navigating to Settings > Channels > Mobile Push > Android.
Add the following dependency in your project level
build.gradlefile inside thebuildscript:
dependencies {
  classpath 'com.google.gms:google-services:4.3.5'
}- Add the following dependencies and plugin to your app level
build.gradlefile:
dependencies {
  // for push notifications
  implementation 'com.clevertap.android:clevertap-android-sdk:4.0.0'
  implementation 'com.google.firebase:firebase-messaging:20.2.4'
}
apply plugin: 'com.google.gms.google-services'- Place the
google-services.jsondownloaded from theFirebase consoleinto the root folder of yourapp. Add yourCLEVERTAP_ACCOUNT_ID,CLEVERTAP_TOKEN&FcmMessageListenerServiceto theapplicationtag of your app’sAndroidManifest.xml:
<meta-data android:name="CLEVERTAP_ACCOUNT_ID" android:value="XXX-XXX-XXXX"></meta-data>
<meta-data android:name="CLEVERTAP_TOKEN" android:value="XXX-XXX"></meta-data>
<service android:name="com.clevertap.android.sdk.pushnotification.fcm.FcmMessageListenerService">
<intent-filter>
<action android:name="com.google.firebase.MESSAGING_EVENT"></action>
</intent-filter>
</service>- Create a notification channel anywhere in your application using the following block of code. You can then use this
channel Idwhile creating any campaign in your CleverTap dashboard.
CleverTapAPI.createNotificationChannel(
    getApplicationContext(),
    "yourChannelId",
    "Your Channel Name",
    "Your Channel Description",
    NotificationManager.IMPORTANCE_MAX,
    true
)
For push notifications and In-app messages to function correctly, CleverTap needs to know the
Applicationstatus as early as possible. You can either setandroid:namein yourAndroidManifest.xmltag tocom.clevertap.android.sdk.Application. If you have a customApplicationclass, callActivityLifecycleCallback.register(this);beforesuper.onCreate().To learn more about push notifications in CleverTap, see the CleverTap documentation.
- Navigate to Target > Signing & Capabilities in Xcode.
- Enable Background Modes/Remote notifications by navigating to Targets > Your App > Capabilities > Background Modes and checking Remote notifications.
- Navigate to Settings > Channels > Mobile Push > iOS.
- Register push notifications for the iOS devices on your CleverTap dashboard either by uploading your Auth Key or APNS push certificate.
- Add the following code in your app just after initializing iOS (Obj-C) SDKiOS (Obj-C) refers to the legacy RudderStack iOS SDK. Note that it will be deprecated soon.
For new implementations, use the iOS (Swift) SDK instead. to register push notifications.
#import <usernotifications>

// register for push notifications
UNUserNotificationCenter* center = [UNUserNotificationCenter currentNotificationCenter];
center.delegate = self;
[center requestAuthorizationWithOptions:(UNAuthorizationOptionAlert | UNAuthorizationOptionSound | UNAuthorizationOptionBadge)
completionHandler:^(BOOL granted, NSError * _Nullable error) {
  if (granted) {
    dispatch_async(dispatch_get_main_queue(), ^(void) {
        [[UIApplication sharedApplication] registerForRemoteNotifications];
        });
  }
}];- Add these handlers for the tokens and push notifications:
#import "RudderCleverTapIntegration.h"

- (void)application:(UIApplication *)application didRegisterForRemoteNotificationsWithDeviceToken:(NSData *)deviceToken {
  [[RudderCleverTapIntegration alloc] registeredForRemoteNotificationsWithDeviceToken:deviceToken];
}

- (void)application:(UIApplication *)application didReceiveRemoteNotification:(NSDictionary *)userInfo fetchCompletionHandler:(void (^)(UIBackgroundFetchResult))completionHandler {
  [[RudderCleverTapIntegration alloc] receivedRemoteNotification:userInfo];
  completionHandler(UIBackgroundFetchResultNoData);
}

- (void)userNotificationCenter:(UNUserNotificationCenter *)center willPresentNotification:(UNNotification *)notification withCompletionHandler:(void (^)(UNNotificationPresentationOptions))completionHandler {
  completionHandler(UNAuthorizationOptionSound | UNAuthorizationOptionAlert | UNAuthorizationOptionBadge);
}

- (void)userNotificationCenter:(UNUserNotificationCenter *)center didReceiveNotificationResponse:(UNNotificationResponse *)response withCompletionHandler:(void (^)(void))completionHandler {
  [[RudderCleverTapIntegration alloc] receivedRemoteNotification:response.notification.request.content.userInfo];
}
Using CleverTap objectId and identity for mapping
This section is applicable when sending events in cloud mode.
CleverTap uniquely identifies each user with two main identifiers, namely objectId and identity. When you enable the Use CleverTap ObjectId for Mapping option in the dashboard, RudderStack uses both objectId and identity and expects the following mapping:
- For
identifyevents:
| RudderStack | RudderStack | CleverTap | CleverTap |
|---|---|---|---|
anonymousId present? | userId present? | objectId | identity |
| Yes | Yes | anonymousId | userId |
| Yes | No | anonymousId | - |
| No | Yes | CleverTap-generated UUID | userId |
- For
trackevents:
| RudderStack | RudderStack | CleverTap | CleverTap |
|---|---|---|---|
anonymousId present? | userId present? | Tracking with | Value |
| Yes | Yes | objectId | anonymousId |
| Yes | No | objectId | anonymousId |
| No | Yes | identity | userId |
If Use CleverTap ObjectId for Mapping setting is disabled in the dashboard, RudderStack expects the following mapping for identifying users and tracking events (track/page/screen):
| RudderStack | CleverTap |
|---|---|
userId or anonymousId | identity |
Why use CleverTap
objectIdfor mapping?When you track an unidentified user in CleverTap, a user profile is created with minimal details along with the user activity details. When the same user is then identified with a
userIdwithout the Use CleverTap ObjectId for Mapping option enabled, RudderStack creates another profile for the user with theuserIdidentifier (in case of RudderStack) which maps to CleverTap’sidentityattribute.One way to solve this problem is to track users only in cases where a
userIdis present. To do so, disable the Enable tracking for anonymous users option in the RudderStack dashboard. Alternatively, you can turn on the Use CleverTap ObjectId for Mapping option in the dashboard which allows you to track the anonymous users and when they are later identified, merge theiranonymousIdwith theiruserId.
Upload device token in cloud mode
This section is applicable for the Android (Java) and iOS (Obj-C) sources when sending events via cloud mode.
When the device token is present in context.device.token in identify calls, RudderStack uses CleverTap’s Upload Device Tokens API to upload the device token for the identified user. For Android, RudderStack sets the token type as fcm. For iOS, it is set as apns.
To use this feature, enable the Use CleverTap ObjectId for Mapping option in the dashboard as RudderStack needs the objectId to upload the device token.
You can also define the token type irrespective of your operating system by sending your choice of device token via the event’s integrations object. The supported token types are listed below:
chromefcmgcmapnswnsmpns
A sample integrations object is shown below:
integrations: {
  All: true,
  CleverTap: {
    deviceTokenType: 'apns',
  },
}
For the chrome device token type, you can also send the chromeKeys object within the integrations object, as shown:
 integrations: {
   All: true,
   CleverTap: {
     deviceTokenType: 'chrome',
     chromeKeys: {
       p256dh: '<value>',
       auth: '<value>'
     },
   },
 },
See the CleverTap documentation on uploading device tokens for more details.
