How to Import Workspace Resources into Your Rudder CLI Project Beta
- free
- growth
- enterprise
13 minute read
This guide walks you through adopting an existing RudderStack workspace with Rudder CLI. You import the workspace’s resources into a new CLI project, link them with apply, and commit the project to Git.
Overview
Rudder CLI manages Data Catalog, Tracking Plans, SQL Models, Event Stream Sources, Destinations, Connections, Transformations, warehouse accounts, and Data Graphs as YAML.
If those resources already exist in your workspace, import them instead of recreating them by hand. The import workspace command writes YAML for them under imported/, and apply then links each workspace resource to its YAML so Rudder CLI manages it from that point on.
CLI-managed and unmanaged resources
Every resource in your workspace is either CLI-managed or unmanaged. Which one it is decides whether import workspace writes a spec for it, and what apply is allowed to do to it.
A resource becomes CLI-managed when either:
applycreates it in the workspace from a spec in your project, orapplylinks an existing workspace resource to a spec you imported.
Internally, Rudder CLI marks the resource by setting an external ID on it, holding the resource’s id from your YAML. Everything else in the workspace, including anything created in the dashboard or through the APIs and never applied, is unmanaged.
Three behaviors follow from this, and they’re the ones that catch people out. They’re also why the same workspace can’t safely be shared between two CLI projects:
import workspaceonly writes specs for unmanaged resources. It skips every resource that’s already CLI-managed, and a managed resource is never imported a second time, into any project. This is why an import into a new, empty directory can fail even though the workspace clearly has resources: those resources are already managed by another project. See Project has changes to be synced.applycompares your project against every CLI-managed resource in the workspace, not only the ones this project created. The external ID doesn’t record which project set it, so there’s no per-project scope. Every CLI-managed resource that your project doesn’t contain is planned for deletion. Unmanaged resources never enter the comparison:applydoesn’t read them, change them, or delete them.- Editing a CLI-managed resource in the dashboard isn’t durable. Rudder CLI has no local state file. It reads the workspace on every
apply, so a change made outside the CLI shows up as a difference, and the nextapplywrites the spec’s values back over it. Change CLI-managed resources by editing the YAML and runningapply. The dashboard is the right place to edit unmanaged resources.
Check whether a resource is CLI-managed
The RudderStack dashboard doesn’t distinguish CLI-managed resources from unmanaged ones. The reliable check is a dry run, which prints the plan and changes nothing:
rudder-cli apply -l <project-directory> --dry-runRead the plan by section:
| Plan section | What it tells you |
|---|---|
| Updated resources | Already CLI-managed. Your project and the workspace differ. |
| Always re-applied (secret values can’t be read back) | Already CLI-managed. Only a secret value differs. |
| Removed resources | Already CLI-managed, and missing from this project. apply would delete them. |
| Importable resources | Not managed yet. apply would take them over and manage them from then on. |
| New resources | Not in the workspace at all. apply would create them. |
If the dry run reports No changes to apply, the CLI-managed resources in the workspace are exactly the ones your project defines.
To list every CLI-managed resource in a workspace, run the dry run from an empty directory: all of them appear under Removed resources. The dry run itself is safe, but never apply that plan. It deletes every resource it lists.
One project per workspace
Adopt the whole workspace with a single CLI project, kept in a single Git repository.
Because apply compares your project with every CLI-managed resource in the workspace, two projects applying to the same workspace each plan deletions for the other’s resources. The second project can’t import its way out of that either, since resources the first project manages are never imported again.
If your workspace already has CLI-managed resources, run the import from the project that manages them. See Project has changes to be synced.
applydeletes CLI-managed resources that aren’t in your projectRunning
applyon an empty or partial project deletes every CLI-managed resource in the workspace that the project doesn’t contain.
- Always run
apply --dry-runfirst and read the full plan. Everything listed under Removed resources is deleted when you apply.- Run
rudder-cli workspace infoto confirm which workspace your token points to. The project directory doesn’t select the workspace.- Never run
applyjust to clear theimport not allowed as project has changes to be syncederror. From an empty project, that apply deletes resources.
Required permissions
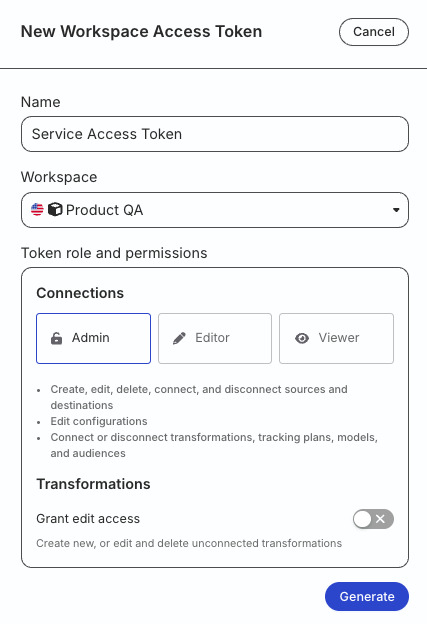
Generate a workspace-level Service Access Token with the permissions required for each resource type you want to import and manage:
Include permissions only for the resource types you use. The same scope applies forapplylocally or in CI/CD. See Manage Workspaces for a deployment-oriented workflow.
| Resource type | Resource | Permissions |
|---|---|---|
| Data Catalog and Tracking Plans | Data Catalog | Edit |
| Tracking Plans | Edit | |
| SQL Models | SQL Models | Create & Delete, Edit |
| Event Stream Sources | Event Stream Sources | Create & Delete, Edit, Connect |
| Tracking Plans | Edit, Connect | |
| Destinations | Destinations | Create & Delete, Edit, Connect |
| Transformations | Transformations | Edit, Connect, Create & Delete |
| Transformation Libraries | Edit |
Important considerations
- To import or apply Event Stream connections, include Connect (and Edit) on both Event Stream Sources and Destinations.
- If a destination links a transformation, also include the Transformations Edit and Connect permissions.
- If you’re on Free or self-hosted plan, or for testing and development only: Generate a Personal Access Token with Read-Write role
Any action authenticated by a Personal Access Token will break if the user generating the token is removed from the organization or there is a breaking change to their permissions.
Token permissions for legacy RBAC system
If you are on the legacy Permissions Management (RBAC) system, your workspace-level Service Access Token should have minimum Admin permissions.
See Generate a workspace-level Service Access Token for steps to create the token.
Adopt an existing workspace
Follow these steps in order. The import itself only reads from your workspace and writes files locally. Nothing in the workspace changes until you confirm an apply.
Step 1: Create an empty project directory
Start from an empty directory under version control:
mkdir my-rudder-project
cd my-rudder-project
git init
import workspace fails if the project has changes to be synced or already contains an imported/ directory. An empty directory avoids both, as long as no other CLI project manages resources in the workspace. If you import into a project that already holds specs with {{ .VAR }} references, you also need to resolve them — see Import a project that uses variable substitution.
Step 2: Authenticate the CLI
Log in with the token you generated in Required permissions:
rudder-cli auth loginThe token determines which workspace you import from and apply to. See Authenticate the CLI for token types.
Rudder CLI stores a single token for your machine (in ~/.rudder/config.json, or the RUDDERSTACK_ACCESS_TOKEN environment variable), not one per project. The project directory name doesn’t select a workspace — a directory named production runs against whichever workspace the current token belongs to. Before every import or apply, confirm the target workspace:
rudder-cli workspace infoStep 3: Import the workspace
rudder-cli import workspace -l .The command scans the workspace for resources that no CLI project manages yet and writes YAML for them under imported/. See What gets imported and where for the layout.
If the command fails with import not allowed as project has changes to be synced, stop here and don’t run apply. See Project has changes to be synced.
Import a project that uses variable substitution
Before it writes anything, import workspace loads your existing local project and diffs it against the workspace, so the project has to load exactly the way apply loads it. If any spec already in your project holds a {{ .VAR }} reference — written by hand, or left by an earlier import — pass the same --var-file you use on apply:
rudder-cli import workspace -l <project-directory> --var-file ./credentials.vars.yamlWithout it, those references stay unresolved, the unresolved text reads as drift against the workspace, and the command fails the way apply does:
variable substitution failed: make sure undefined variables are defined in a variable file and passed with --var-fileRudder CLI lists the variables it couldn’t resolve above that line. A project whose specs hold no {{ .VAR }} references doesn’t need the flag.
Supply values from more than one source
--var-file is repeatable, and a later file takes priority over an earlier one — useful for a shared base file with per-environment overrides:
rudder-cli import workspace -l <project-directory> \
  --var-file base.vars.yaml \
  --var-file prod.vars.yaml
Environment variables also resolve references, using the variable name with a RUDDER_ prefix. These take priority over every var file, which makes them a good fit for CI:
export RUDDER_AWS_SECRET_ACCESS_KEY="wJal..."
rudder-cli import workspace -l <project-directory>
See How to Use Variable Substitution in Rudder CLI for writing the references and the var file.
Step 4: Review the generated files
Confirm the generated YAML matches what you expect. You can move files out of imported/ to match your layout and edit fields such as names or descriptions. Before you do, read Important considerations for the rules on IDs, import metadata, and dashboard changes.
Secret values aren’t imported. Secret fields, for example in destinations and warehouse accounts, are written as {{ .VAR }} placeholders, and import scaffolds imported/secrets.vars.yaml with one entry per variable. Fill in every value before you continue. See Fill placeholders after import.
Step 5: Preview the changes with a dry run
rudder-cli apply -l . --dry-runIf your specs contain {{ .VAR }} placeholders, pass the var file too, for example --var-file imported/secrets.vars.yaml.
A dry run prints the plan and changes nothing. For a fresh import, the plan should list only importable resources:
Importable resources:
  - category:abc
- category:webapp| Plan section | What apply does | Expected after a fresh import? |
|---|---|---|
| Importable resources | Links the existing workspace resource to its YAML. | Yes |
| New resources | Creates a new resource in the workspace. | No. Check whether you added specs, or whether you’re authenticated against a different workspace than the one you imported from. |
| Updated resources | Changes a resource that’s already CLI-managed. | No |
| Removed resources | Deletes the resource from the workspace. | No. Don’t apply. |
If the plan shows anything other than importable resources, don’t apply until you understand why.
The dry run lists importable resources without field-level details. If you edited an imported spec,applypushes that edit to the workspace resource when it links it.
Step 6: Apply to link the resources
rudder-cli apply -l .apply shows the same plan and asks you to confirm:
$ rudder-cli apply -l .

Importable resources:
  - category:abc
  - category:webapp

? Do you want to apply these changes? (y/N)
For each importable resource, apply tags the existing workspace resource with the resource’s ID from your YAML and updates it to match the spec. It doesn’t create a new copy. After you confirm, you manage those resources through Rudder CLI.
Step 7: Commit the project to Git
Commit the project so every later change is reviewable and reversible. Keep var files that hold real credentials, such as secrets.vars.yaml, out of version control. See Keep the var file out of version control.
To confirm the adoption is complete, run apply --dry-run again. It should report No changes to apply. The only exception is resources listed under Always re-applied (secret values can’t be read back). Rudder CLI can’t read secrets back from the workspace, so it re-sends them on every apply.
Move the files out ofimported/, or rename the directory, before you runimport workspaceagain. The command fails ifimported/already exists.
What gets imported and where
project/
└── imported/
    ├── data-catalog/
    │   ├── events/events.yaml
    │   ├── properties/properties.yaml
    │   ├── categories/categories.yaml
    │   ├── custom-types/custom-types.yaml
    │   └── trackingplans/
    │       └── <tracking-plan>.yaml
    ├── retl/
    │   └── sql-models/
    │       └── <model>.yaml
    ├── event-stream/
    │   ├── connections.yaml
    │   └── sources/
    │       └── <source>.yaml
    ├── destinations/
    │   └── <destination>.yaml
    ├── accounts/
    │   └── <account>.yaml
    ├── data-graphs/
    │   └── <data-graph>.yaml
    ├── transformations/
    │   ├── <transformation-or-library>.yaml
    │   ├── javascript/
    │   │   └── <transformation-or-library>.js
    │   └── python/
    │       └── <transformation-or-library>.py
    └── secrets.vars.yaml
File and directory names are generated from each resource’s name in kebab case, for example User Signed Up becomes user-signed-up.
If a resource type has no instances, its folder is omitted.
| Resource | Path (under imported/) | Notes |
|---|---|---|
| Events | data-catalog/events/events.yaml | All event definitions in one file |
| Properties | data-catalog/properties/properties.yaml | All property definitions in one file |
| Event Categories | data-catalog/categories/categories.yaml | All categories in one file |
| Custom Types | data-catalog/custom-types/custom-types.yaml | All custom types in one file |
| Tracking Plans | data-catalog/trackingplans/ | One YAML per plan
|
| SQL Models | retl/sql-models/ | One YAML per model, with the SQL inline |
| Event Stream Sources | event-stream/sources/ | One YAML per source
|
| Event Stream connections | event-stream/connections.yaml | One YAML file listing all Event Stream connections (kind: event-stream-connections) |
| Destinations | destinations/ | One YAML per destination. Only destination types that your Rudder CLI version supports are imported; others are skipped and stay unmanaged. The imported YAML may or may not include secret config keys — populate each one the configuration needs through variable substitution before you apply. See Fill placeholders after import. |
| Warehouse accounts | accounts/ | One YAML per account. Secret fields are written as {{ .VAR }} placeholders. |
| Data Graphs | data-graphs/ | One composite YAML per data graph, including its models and relationships |
| Transformations and libraries | transformations/ | One YAML per transformation or library, with the code in a separate file under javascript/ or python/ |
| Secrets var file | secrets.vars.yaml | Written only when an imported spec references a secret variable. Fill in the values and keep the file out of version control. |
Folder names underimported/follow the layout your Rudder CLI version generates. If you upgrade the CLI and the structure changes, compare the new output with this table and move files as needed before you runapply.
Import metadata
YAML from an import includes metadata.import so Rudder CLI can match local definitions to workspace resources.
For how workspace_id behaves when you target another workspace, see Manage Workspaces.
Example:
version: rudder/v1
kind: "categories"
metadata:
  name: "categories"
  import:
    workspaces:
      - workspace_id: "3NrueK2Hu7ooXVQqQJhKqKlnofE"
        resources:
          - urn: "category:abc"
            remote_id: "cat_343HNkcWRt8YXHphthHwa8QEdXE"
          - urn: "category:webapp"
            remote_id: "cat_2ohsVV9iKuw7GfLFITwsVLn6Nhy"
spec:
  categories:
    - id: "abc"
      name: "ABC"
    - id: "webapp"
name: "Webapp"| Property | Type | Description |
|---|---|---|
workspace_id | String | Workspace the resources were imported from. apply links a resource only when this matches the workspace of your token. |
resources | Array | Maps each resource urn to a workspace remote_id. Do not change remote_id after import; see Important considerations. |
urn | String | Local resource identifier in the format <resource-type>:<id>, where <id> is the resource’s id in the spec. Older rudder/0.1 specs use local_id instead. |
For the full metadata schema, see the CLI Project Resources YAML Reference.
Important considerations
This section covers important considerations when importing workspace resources and applying them to your CLI project.
Use Rudder CLI as the source of truth
For CLI-managed resources, use only Rudder CLI (not the dashboard or APIs) unless you intend to reconcile outside changes. After a successful apply, Rudder CLI is the source of truth for those resources.
IDs, metadata, and the dashboard
- Do not change
remote_idvalues in imported YAML — updates will fail. - You may change a resource’s
idonly beforeapply. Update the matchingurn(orlocal_id) in the import metadata to the same value. - After
apply, do not change a resource’sid. - Do not delete a resource in the dashboard after import but before
apply— otherwiseapplywill fail withResource with ID not found. See Resource Deleted from Dashboard Before Apply.
Workflow tips
- Try the flow in a development workspace before production.
- Keep one project per workspace. See One project per workspace.
Next steps
- See Manage Workspaces for workspace promotion and CI/CD
- See Fill placeholders after import if imported YAML contains
{{ .VAR }}placeholders - See Troubleshooting for common import and
applyerrors
